
Are you tired of your kayak taking up valuable space in your garage or backyard? If you’re like many kayak enthusiasts, you know that proper storage is essential to maintaining your kayak’s longevity and performance. This article will guide you through the process of creating your own DIY hanging kayak storage, a practical and cost-effective solution that keeps your kayak secure and easily accessible.
Why Opt for DIY Hanging Kayak Storage?
Space-saving
Storing your kayak off the ground saves valuable floor space and helps you maintain a clutter-free environment. Hanging kayak storage systems are perfect for those with limited storage areas, as they allow you to utilize vertical space efficiently.
Easy access
A hanging storage system makes it easier to access your kayak when you’re ready for your next adventure. You can easily lift it off the hanging system, avoiding the hassle of dragging it out from a tight spot.
Cost-effective
Commercial kayak storage systems can be pricey, but creating your own DIY solution is an affordable alternative. With a little bit of time, effort, and the right materials, you can save money without sacrificing quality or functionality.
Choosing the Right Location for Your DIY Hanging Kayak Storage
Before starting your project, it’s crucial to select the appropriate location for your hanging kayak storage. Consider factors like available wall or ceiling space, proximity to doors or windows, and protection from harsh weather conditions. Ideally, choose an area that offers ample space for maneuvering your kayak and is free of obstructions.
Types of DIY Hanging Kayak Storage Solutions
There are several methods for creating a hanging kayak storage system. Here are three popular options:
Suspension systems
These involve using straps, ropes, or webbing to suspend your kayak from the ceiling or a sturdy overhead structure. Suspension systems are easy to set up and relatively inexpensive, making them a popular choice for DIY enthusiasts.
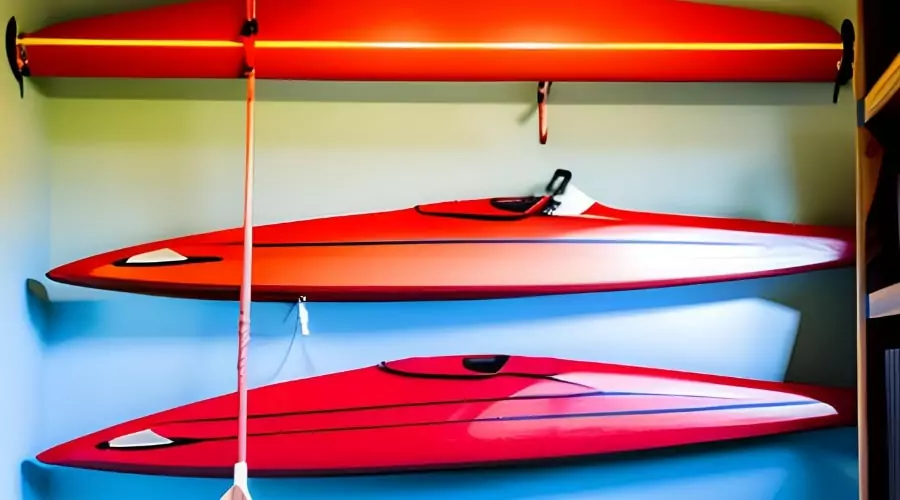
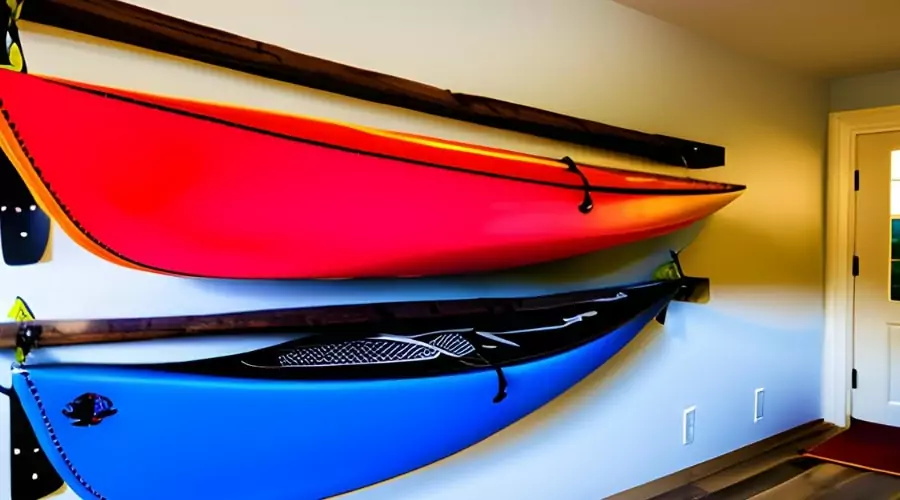
Wall-mounted brackets
Wall-mounted brackets require attaching horizontal supports to the wall and resting the kayak on top of them. This option is ideal for those with limited ceiling space or who prefer to keep their kayak closer to the ground.
Ceiling-mounted hoists
A ceiling-mounted hoist uses a system of pulleys and ropes to lift and lower the kayak. This option is perfect for those who want to keep their kayak high off the ground but still have easy access when needed.
Materials and Tools Needed
To create your DIY hanging kayak storage, you’ll need some basic materials and tools. These may vary depending on the storage method you choose, but common items include:
- Heavy-duty straps, ropes, or webbing (for suspension systems)
- Brackets or lumber (for wall-mounted brackets)
- Pulleys and ropes (for ceiling-mounted hoists)
- Mounting hardware (screws, anchors, and brackets)
- Drill and drill bits
- Level
- Tape measure
- Stud finder (for locating wall studs or ceiling joists)
Building a DIY Suspension System
- Locate the ceiling joists using a stud finder and mark their positions.
- Measure the width of your kayak and determine the appropriate spacing for your straps or ropes.
- Install heavy-duty eye hooks or brackets into the ceiling joists, ensuring they are securely fastened.
- Thread the straps or ropes through the eye hooks or brackets, creating loops that will cradle the kayak.
- Adjust the length of the straps or ropes so that your kayak hangs level and at the desired height.
- Place your kayak in the loops and ensure it is securely supported.
Creating Wall-Mounted Brackets
- Locate the wall studs using a stud finder and mark their positions.
- Measure the width of your kayak and determine the appropriate spacing for your brackets.
- Cut lumber to the desired length to create horizontal supports for the kayak.
- Attach the lumber to the wall studs using heavy-duty brackets, ensuring the supports are level.
- Place your kayak on the horizontal supports and ensure it is securely resting on them.
Installing a Ceiling-Mounted Hoist
- Locate the ceiling joists using a stud finder and mark their positions.
- Install pulleys and eye hooks into the ceiling joists, ensuring they are securely fastened.
- Thread ropes through the pulleys, creating a system that allows you to raise and lower the kayak.
- Attach straps or hooks to the ends of the ropes that will secure the kayak.
- Lift the kayak and fasten the straps or hooks to it, ensuring it is securely suspended.
- Use the hoist system to raise your kayak to the desired height and secure the ropes.
Securing Your Kayak in the Hanging Storage
No matter which hanging storage method you choose, make sure your kayak is properly secured to prevent accidents or damage. This includes tightening straps or ropes, checking that the kayak is level and evenly supported, and verifying that all mounting hardware is secure.
Safety Considerations
When creating your DIY hanging kayak storage, safety should be a priority. Follow these guidelines to ensure your storage solution is safe and secure:
- Always use sturdy, heavy-duty materials and mounting hardware.
- Ensure your kayak is properly supported and secured in the storage system.
- Regularly inspect the hanging storage system for signs of wear or damage.
- Do not exceed the weight capacity of your chosen storage method.
Maintenance Tips
To keep your DIY hanging kayak storage in top condition, follow these maintenance tips:
- Regularly inspect the system for signs of wear or damage and replace any worn or damaged components.
- Keep straps, ropes, and other materials clean and dry to prevent mold or mildew.
- Lubricate pulleys and other moving parts in a ceiling-mounted hoist system to ensure smooth operation.
Frequently Asked Questions:
Can I use a DIY hanging kayak storage system for multiple kayaks?
Yes, you can create a hanging storage system that accommodates multiple kayaks by increasing the number of support points or brackets, and ensuring that the system can support the combined weight of the kayaks.
How much weight can a DIY hanging kayak storage system hold?
The weight capacity of your storage system depends on the materials used, the mounting hardware, and the structural integrity of the wall or ceiling it is attached to. Always ensure that your chosen storage method can safely support the weight of your kayak.
Is it safe to store a kayak outdoors using a hanging storage system?
While it’s possible to store your kayak outdoors using a hanging storage system, you should take additional precautions to protect it from the elements, such as using a weather-resistant cover. Additionally, ensure that the materials and hardware used in your storage system are suitable for outdoor use.
Can I store my kayak horizontally or vertically using a hanging storage system?
Yes, you can store your kayak either horizontally or vertically, depending on your preference and available space. Just make sure your chosen storage method provides adequate support and is properly secured to prevent damage or accidents.
How high should I hang my kayak in the storage system?
The height at which you hang your kayak depends on your available space, ceiling height, and personal preference. It should be high enough to keep it off the ground and out of the way, but not so high that it becomes difficult to access or poses a safety risk.
Conclusion
A DIY hanging kayak storage system is an affordable and effective way to keep your kayak safe, secure, and easily accessible. By following the steps outlined in this article, you can create a storage solution tailored to your needs, ensuring your kayak remains in top condition and ready for your next adventure.